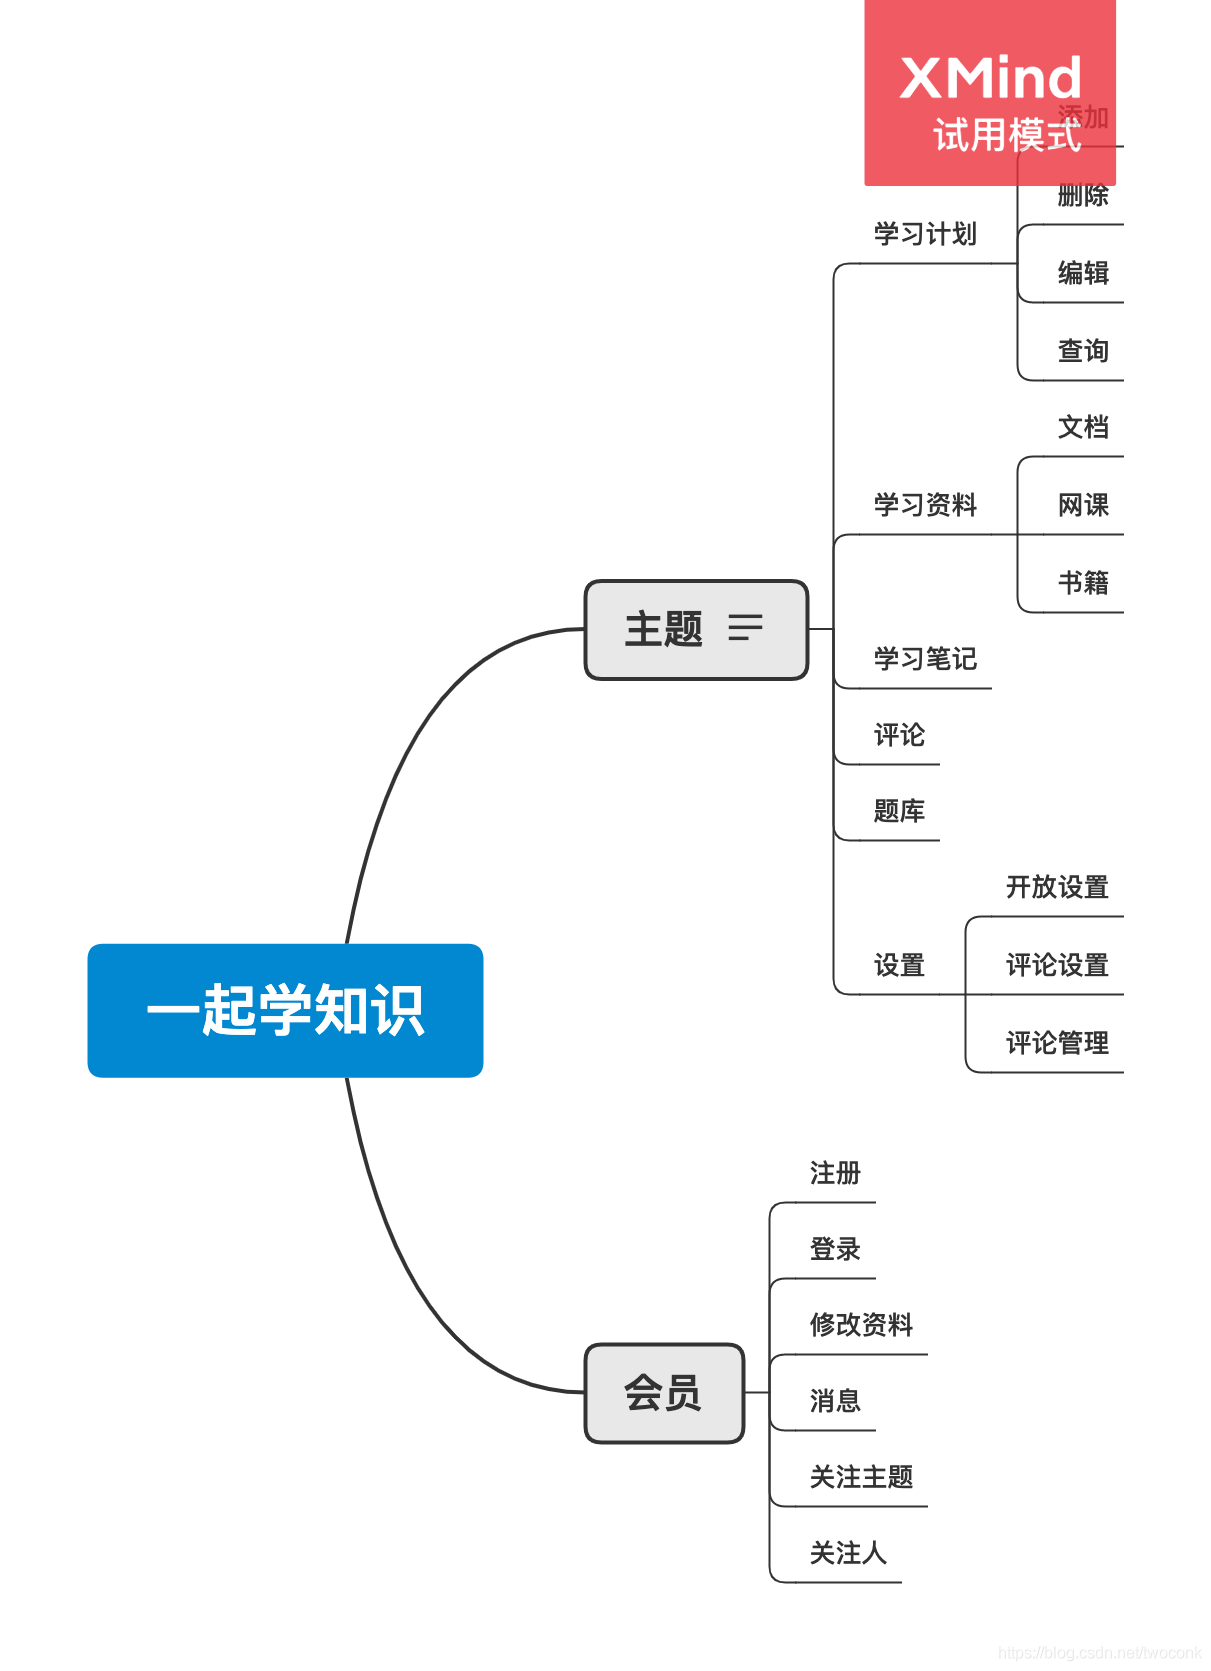
一个基于Go语言实现的组团学习网站,代码已开源
测试站点:https://pub6.top/
开放的代码对于理解gf框架,练习Go语法是足够的,总结的话,主要有几点:
1. 第一个是数据库操作,关联表查询;
2. 用户token认证;
3. 应该是session context数据共享,但并没有深入去用;
4. 前端layui数据共享,页面跳转,缓存冲突,重要的草稿功能;
1、Gframe框架参考文档网站: https://itician.org/pages/viewpage.action?pageId=1114145
主要需要理解GFrame的框架设计思路,目录结构,和常用的api的使用方法;
0、项目数据库文件 :
\pub6\data\db.sql
\pub6\data\pub6.sql
创建数据库并导入;
1、配置文件为:\pub6\config\config.toml 当前server配置信息如下,端口为8200, 服务器使用的资源文件根路径为./public/resource
[server]
    Address          = ":8200"
    ServerRoot       = "./public/resource"
    AccessLogEnabled = true
    ErrorLogEnabled  = true
    PProfEnabled     = true
    LogPath          = "./data/log/server_log"
    SessionIdName    = "sysSessionId"
    SessionPath      = "./data/session"
    SessionMaxAge    = "24h"
    DumpRouterMap    = true
    NameToUriType = 3
其中jwt配置
[gToken]

CacheMode = 2 此处若使用了redis配置为2 若没使用redis配置1
CacheKey = "GToken:"
Timeout = 0
MaxRefresh = 0
TokenDelimiter="_"
EncryptKey = "koi29a83idakguqjq29asd9asd8a7jhq"
AuthFailMsg = "登录超时,请重新登录"
MultiLogin = true
##运行 go run main.go 直接访问http://localhost:8200  现在直接访问的是./public/resource/index.html
如果要访问gfast的管理后台,可以使用http://localhost:8200/admin.html
2、前端使用的layui的fly版本,路径在:\pub6\public\resource, layui的模块代码主要在\pub6\public\resource\res\mods\ ;
2、设计数据库和表结构,生成对应的model文件,在gfast的路径下,使用的命令是gf gen命令生成model代码;
gf gen model ./app/model/topic -t 业务表名
在线生成业务表的controller、service代码,并拷贝到相应目录;
数据库设计:
这里面有点复杂的就是题库的设计,题库的生成和答卷的记录;可以见data路径下的sql文件;
3、路由设计:
修改routerAdmin.go 注意:这个group放在哪个更路径下//扩展业务
group.Group("/module", func(group *ghttp.RouterGroup) {
group.ALL("/xxx", new(module.xxx))
})
非登录状态下使用的api
	group := s.Group("/")
	//api
	globaltopicTask := new (topic.Task)
	group.POST("/pub6/topic/tasks", globaltopicTask.List)

	globaltopicMembers := new (topic.Members)
	group.POST("/pub6/topic/members", globaltopicMembers.List)

	globaltopicNotes := new (topic.Notes)
	group.POST("/pub6/topic/notes", globaltopicNotes.List)

	globaltopicNotices := new (topic.Notices)
	group.POST("/pub6/topic/notices", globaltopicNotices.List)

	globaltopicResources := new (topic.Resource)
	group.POST("/pub6/topic/resources", globaltopicResources.List)

	globaltopic := new(topic.Topic)
	group.POST("/pub6/topic/all", globaltopic.List)
	group.POST("/pub6/topic/type", globaltopic.ListByType)
	group.GET("/pub6/topic/getcomments”, globaltopic.CommentList)
	group.GET("/pub6/topic/get", globaltopic.Edit)
	group.POST("/pub6/topic/category", globaltopic.Catgory)

	globaluser := new(topic.Users)
	group.POST("/pub6/user/reg", globaluser.Add)
登录状态下使用系统api
	group := s.Group("/")
	//api

	group.Group("/api.v2", func(group *ghttp.RouterGroup) {
		group.ALL("/csrf", func(r *ghttp.Request) {
			r.Response.Writeln(r.Method + ": " + r.RequestURI)
		})
		/*
		group.Middleware(csrf.NewWithCfg(csrf.Config{
			Cookie: &http.Cookie{
				Name: "_csrf",// token name in cookie
			},
			ExpireTime:      time.Hour * 24,
			TokenLength:     32,
			TokenRequestKey: "X-Token",// use this key to read token in request param
		}))
		*/

		group.Middleware(middleWare.UserAuth) //后台权限验证
	 	group.ALL("/topic", new(topic.Topic))
	 	group.ALL("/topicresource", new (topic.Resource))
	 	group.ALL("/topictask", new (topic.Task))
	 	group.ALL("/topicmembers", new (topic.Members))
	 	group.ALL("/topictaskprogress", new (topic.Taskprogress))
	 	group.ALL("/topicnotes", new (topic.Notes))
	 	group.ALL("/topicntices", new (topic.Notices))
	 	group.ALL("/user", new(topic.Users))
	 	group.ALL("/question", new(topic.Questions))
	 	group.ALL("/questionhistory", new(topic.History))
	 	group.ALL("/questionhistorydetail", new(topic.Detail))
	 	group.ALL("/booklist", new (topic.BookResource))
	 	group.ALL("/bookcatetory", new (topic.Category))


})4、使用https://127.0.0.1:8200/ 访问并验证
代码提交 github: https://github.com/twoconk/pub6.git
想得有点大,本来想做一个翻转课堂的工具型站,包括笔记、音视频、题库,做着做着就发现没那么容易,一个人毕竟精力有限,看群里有同学分享一个群组 todo 的网站,还是有前端经验的同学出来的效果好,做了两个月,现在来看只能算是能用,近期刚好在学习 Go,后端是基于 Go 的框架,使用gframe的框架,代码也开放出来,有兴趣的同学来玩;
-------------
测试站点:https://pub6.top/
-------2021..4.26更新,增加OAuth的三方登录功能:
参考文档:
https://developer.github.com/apps/building-oauth-apps/authorizing-oauth-apps/
https://gitee.com/api/v5/oauth_doc#/list_1
github或者gitee均提供了第三方应用的注册入口,先填写应用信息,以及关键的业务服务器的回调地址,然后gitee和github注册成功后会得到一串client_id、client_secret ,特别是client_secret只能在服务器存储,避免非法使用;
大概的流程是三步:
1、Web页面跳转到github或者gitee的页面授权地址;
github用户授权地址是:https://github.com/login/oauth/authorize?client_id=2767920b490b153fa3e3&scope=user:email&redirect_uri=
Gitee 用户授权地址是:https://gitee.com/oauth/authorize?client_id=d83a0da2fbfa8bb95d0d29e05d3ce27b35953a6fd5d5cb1fd17e2e2a163962ed&response_type=code&redirect_uri="+g.Cfg().GetString("server.SiteName")+"pub6/user/oauthcallbackgitee")
用户授权后,三方调用回调地址并返回用户授权码,通过授权码获取访问三方服务器上用户的信息;
注意的是 redirect_uri一定是在注册页面填写的回调地址;并且建议这个地址可以直接是个前端页面的地址,这样页面拿到授权的code码后,可以直接调用自己业务系统的后台,完成登录到操作;
2、用户授权后,会回调到应用业务服务器的回调地址,这个时候如果直接通过用户授权码调用三方服务器的认证和获取用户信息的话,其实前端页面是不能感知的,所以就直接把页面做了跳转,页面跳转参数中包括了用户授权码code,通过code进一步获取access_token,并通过access_token获取到用户的账号、或者头像信息,返回本业务服务器的登陆token到页面,三方登录就正常完成了。
这也是上面提到的redirect_uri需要填写一个前端页面地址的原因;
3、用户授权完成后,业务服务器需要返回正常登陆成功的token,这里token使用的是GfToken,由于GfToken没有单独生成token的方法,所以修改了源码,增加了一个方法:
//GenToekn
func (m *GfToken) JustGenToken(userKey string, data interface{}) Resp{
if m.MultiLogin {
// 支持多端重复登录,返回相同token
userCacheResp := m.getToken(userKey)
if userCacheResp.Success() {
respToken := m.EncryptToken(userKey, userCacheResp.GetString("uuid"))
//m.LoginAfterFunc(r, respToken)
return respToken
}
}
// 生成token
respToken := m.genToken(userKey, data)
return respToken
}
//生成gtoken
topicGfToken := >oken.GfToken{
CacheMode: g.Cfg().GetInt8("gToken.CacheMode"),
CacheKey: g.Cfg().GetString("gToken.CacheKey"),
Timeout: g.Cfg().GetInt("gToken.Timeout"),
MaxRefresh: g.Cfg().GetInt("gToken.MaxRefresh"),
TokenDelimiter: g.Cfg().GetString("gToken.TokenDelimiter"),
EncryptKey: g.Cfg().GetBytes("gToken.EncryptKey"),
AuthFailMsg: g.Cfg().GetString("gToken.AuthFailMsg"),
MultiLogin: true,
LoginPath: "/pub6Login/login",
LoginBeforeFunc: nil,
LoginAfterFunc: nil,
LogoutPath: "/pub6Login/logout",
AuthPaths: g.SliceStr{"/api.v2/*"},
AuthAfterFunc: nil,
LogoutBeforeFunc: nil,
}
if !topicGfToken.InitConfig() {
response.FailJson(true, r, "[token error]no Login users info resp.")
}
respData := topicGfToken.JustGenToken(respUserInfo.Login + "#eK3d9384cd" + gconv.String(entity.Id), entity);
token := respData.GetString("token")
//返回用户信息及token信息
r.Response.WriteJson(gtoken.Succ(g.Map{
"token": token,
"uid": entity.Id,
"salt": entity.Salt,
"from_3rd":1,
"username": entity.Name,
"ext": respUserInfo.AvatarUrl,
"action": "",
}))
-------------------广告线---------------
项目、合作,欢迎勾搭,邮箱:promall@qq.com
本文为呱牛笔记原创文章,转载无需和我联系,但请注明来自呱牛笔记 ,it3q.com

- 最新评论
- 总共0条评论


